[Keras] 튜토리얼8 - 함수형으로 모델 구축(functional API)
지금까지 예제에 사용했던 모델을 설계하는 방식은 sequential API를 사용한 것 입니다.
하지만 sequential API는 여러층을 공유하거나, 다양한 종류의 입출력을 사용하는 등의 복잡한 모델을 만드는 일을 하기에는 한계가 있습니다. 이번 포스팅에서는 복잡한 모델을 생성할 수 있는 방식은 functioanl API(함수형 API)에 대해서 알아봅시다.

● Sequential API
|
1
2
3
4
|
from tensorflow.keras.models import Sequential
from tensorflow.keras.layers import Dense
model=Sequential()
model.add(Dense(3, input_dim=4, activation='softmax'))
|
cs |
sequential api를 이용한 방식은 직관적이고 편리하지만 단순히 층을 쌓는 것만으로는 구현할 수 없는 복잡한 Neural Network를 구현할 수 없습니다.
● Functional API
- Sequential API와 Functional API 차이점
- functional api에서는 입력 데이터의 크기(shape)을 Input() 함수의 인자로 입력층을 정의해주어야 합니다.
- 이전층을 다음층 함수의 입력으로 사용하고, 변수에 할당합니다.
- Model() 함수에 입력과 출력을 정의합니다.
여기서 shape = (1,) 엄밀히 말하면 vector가 한개라는 뜻이됩니다. 데이터.shape이 (5,1)일 경우 5행1열을 가진 데이터라는 뜻이 되는데요. 여기서 행은 무시하고 열!만 shape으로 입력을 해주는 것 입니다. 데이터는 계속 추가 될 수 있으므로 열(feature)만 중요하기 때문입니다.
1) 전결합 피드 포워드 신경망(Fully-connected FFNN)
|
1
2
3
4
5
6
7
|
from tensorflow.keras.layers import Input, Dense
from tensorflow.keras.models import Model
inputs = Input(shape=(10,))
hidden1 = Dense(64, activation='relu')(inputs)
hidden2 = Dense(64, activation='relu')(hidden1)
output = Dense(1, activation='sigmoid')(hidden2)
model = Model(inputs=inputs, outputs=output)
|
cs |
이 예제는 입력의 차원이 1인 전결합 피드 포워드신경망(Fully-connected FFNN)을 구현한 것입니다.
|
1
2
3
4
5
|
inputs = Input(shape=(10,))
x = Dense(8, activation="relu")(inputs)
x = Dense(4, activation="relu")(x)
x = Dense(1, activation="linear")(x)
model = Model(inputs, x)
|
cs |
이런식으로 은닉층과 출력층의 변수를 전부 x로 통일하여 사용하여도 됩니다.
이렇게 model 이라는 변수에 최종적으로 할당한 모델은 sequential api와 마찬가지로 model.compile, model.fit 등으로 컴파일하고 훈련하여 사용이 가능합니다.
2) 선형 회귀(Linear Regression)
|
1
2
3
4
5
6
7
8
9
10
|
from tensorflow.keras.layers import Input, Dense
from tensorflow.keras.models import Model
inputs = Input(shape=(3,))
output = Dense(1, activation='linear')(inputs)
linear_model = Model(inputs, output)
linear_model.compile(optimizer='sgd', loss='mse')
linear_model.fit(x=dat_test, y=y_cts_test, epochs=50, verbose=0)
linear_model.fit(x=dat_test, y=y_cts_test, epochs=1, verbose=1)
|
cs |
선형 회귀 : 1차원 방정식의 기울기(함수식)을 구하는 것
3) 로지스틱 회귀(Logistic Regression)
|
1
2
3
4
5
6
7
8
9
10
|
from tensorflow.keras.layers import Input, Dense
from tensorflow.keras.models import Model
inputs = Input(shape=(3,))
output = Dense(1, activation='sigmoid')(inputs)
logistic_model = Model(inputs, output)
logistic_model.compile(optimizer='sgd', loss = 'binary_crossentropy', metrics=['accuracy'])
logistic_model.optimizer.lr = 0.001
logistic_model.fit(x=dat_train, y=y_classifier_train, epochs = 5, validation_data = (dat_test, y_classifier_test))
|
cs |
로지스틱 회귀 : 직선 대신, S자 곡선을 이용하여 분류에 정확도를 향상
4) 다중 입력을 받는 모델(multiple inputs model)
|
1
2
3
4
5
6
7
8
9
10
11
12
13
14
15
16
17
18
19
20
21
22
23
24
25
26
27
28
|
from tensorflow.keras.layers import Input, Dense, concatenate
from tensorflow.keras.models import Model
# 두 개의 입력층을 정의
inputA = Input(shape=(64,))
inputB = Input(shape=(128,))
# 첫번째 입력층으로부터 분기되어 진행되는 인공 신경망을 정의
x = Dense(16, activation="relu")(inputA)
x = Dense(8, activation="relu")(x)
x = Model(inputs=inputA, outputs=x)
# 두번째 입력층으로부터 분기되어 진행되는 인공 신경망을 정의
y = Dense(64, activation="relu")(inputB)
y = Dense(32, activation="relu")(y)
y = Dense(8, activation="relu")(y)
y = Model(inputs=inputB, outputs=y)
# 두개의 인공 신경망의 출력을 연결(concatenate)
result = concatenate([x.output, y.output])
# 연결된 값을 입력으로 받는 밀집층을 추가(Dense layer)
z = Dense(2, activation="relu")(result)
# 선형 회귀를 위해 activation=linear를 설정
z = Dense(1, activation="linear")(z)
# 결과적으로 이 모델은 두 개의 입력층으로부터 분기되어 진행된 후 마지막에는 하나의 출력을 예측하는 모델이 됨.
model = Model(inputs=[x.input, y.input], outputs=z)
|
cs |
5) RNN(Recurrence Neural Network) 은닉층 사용하기
|
1
2
3
4
5
6
7
|
from tensorflow.keras.layers import Input, Dense, LSTM
from tensorflow.keras.models import Model
inputs = Input(shape=(50,1))
lstm_layer = LSTM(10)(inputs) # RNN의 일종인 LSTM을 사용
x = Dense(10, activation='relu')(lstm_layer)
output = Dense(1, activation='sigmoid')(x)
model = Model(inputs=inputs, outputs=output)
|
cs |
하나의 피처(feature)에 50개의 시점(time-step)을 입력으로 받는 모델 설계 예시 코드입니다.
RNN 대한 구체적인 사항은 따로 포스팅하도록 하겠습니다.
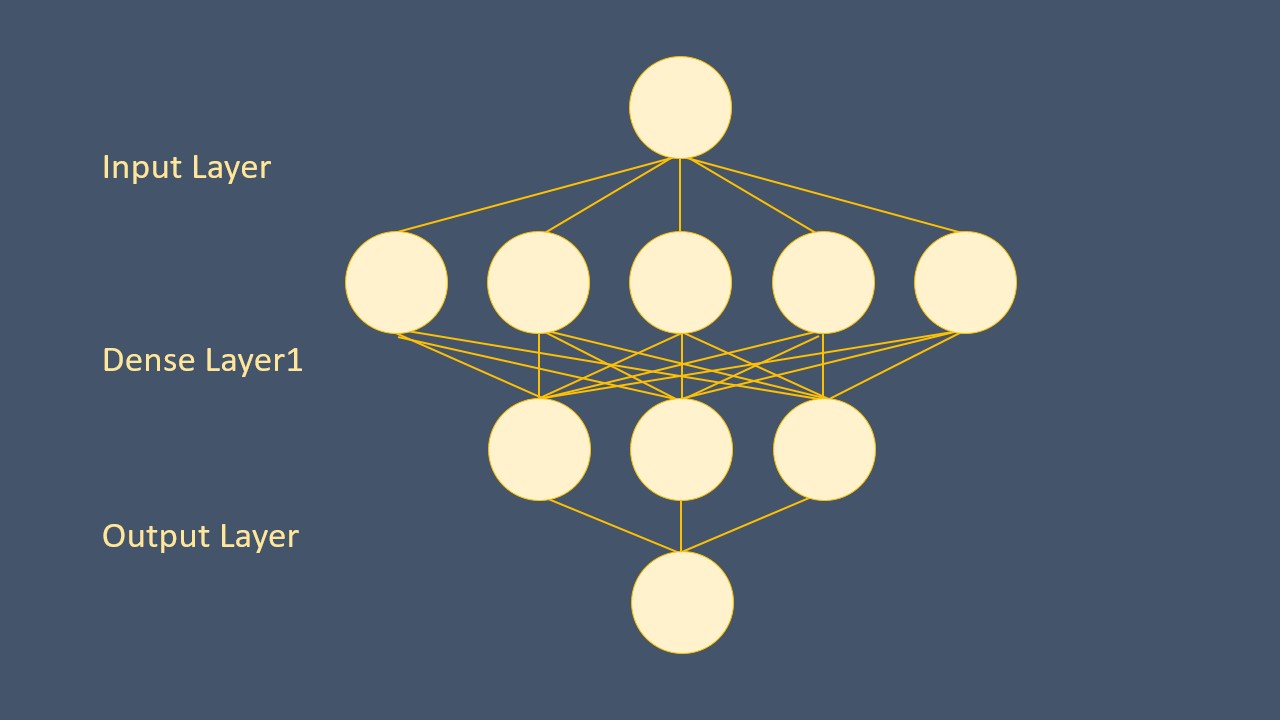
- 구현해보기

위와 같은 그림의 모델을 구현한다고 하면,
먼저 Sequential API로 구현하였을 경우
model = Sequential()
model.add(Dense(5, input_dim=1, activation='relu'))
model.add(Dense(3))
model.add(Dense(1))
Funtional API로 구현하였을 경우
input1 = Input(shape=(1,)) # 최초의 input 명시, 컬럼 1개
dense1 = Dense(5, activation='relu')(input1) # 앞 -> 꽁무니
dense2 = Dense(3)(dense1) # input 5, output 3
output1 = Dense(1)(dense2)

model = Model(inputs=input1, outputs=output1) # 이Model은 inpt1~output1이다 명시
위처럼 복잡한 구조를 만들지 않을 때는 Input에서 shape 정의, 앞의 레이어 정의, model()에 입출력 정의를 하는 것 외에는 두 가지 방법을 사용하는 것은 비슷합니다. 간단한 구조를 만들때는 Sequential API을 이용해서 직관적이고 빠르게 모델을 만들고 복잡한 구조의 모델을 만들때는 주로 Functial API를 사용한다고 생각하면 될 것 같습니다.
'AI 개발' 카테고리의 다른 글
| [Keras] 튜토리얼9 - MLP(MultiLayer Perceptron) 구현하기 (0) | 2019.12.30 |
|---|---|
| [Anaconda] 개발환경 설치 및 WIN32 응용프로그램 오류 (3) | 2019.12.27 |
| [Keras] 튜토리얼7 - 데이터 자르기(train_test_split) (1) | 2019.12.20 |
| [Keras] 튜토리얼6 - train, test, validation DATA (0) | 2019.12.19 |
| [Keras] 튜토리얼5 - summery()로 모델 구조 확인 (1) | 2019.12.18 |
소중한 공감 감사합니다